

Cerium Oxide Carpet Wheel Plans
By Currently Rockhounding

One of the hardest things I have personally found in lapidary to do is putting a nice, wet-looking polish on a large, flat rock. With this machine, I have now been able to accomplish that in a timely fashion, and the affordability of the machine is a bonus.
This machine is not intended to take a rough-cut rock from a saw up to a final polish, but rather it is the final step after you have taken your stone up through the grits on another machine.
At the time in which I built this, fall of 2021, I spent the following amounts on the components that I didn’t have on hand:
3/4″ Bore H Style Steel Sheave / Pulley Bushing Split Taper For Keyed Shaft: $15
1/4″ Steel Plate Round Circle Disc 12″ Diameter A36 Steel: $18
3/4″ X 36” Steel Keyed Shaft: $25
Fenner Drives 6899549 AFD12434 Driven Pulley, Fixed 3/4″ Bore, 12.25″ OD: $36
Pillow Block Mounted Ball Bearing – 3/4″ Bore Self Aligning (2 Pack): $16
The motor I went with was a used motor I got at a swap meet. It is a 1/8hp 1450rpm motor that I paid $25 for. The 1/8hp motor is plenty strong for this job.
The reason for the 1450rpm motor with a 2” pulley on it and the 12.25” pulley on the drive shaft is that you get a ratio of 1 : 6.13 which produces an RPM at the carpet wheel of 236rpm. A more common and larger motor that you will find is the 1/3hp 1725rpm motor, if this is what you have, you will want some different pulleys to maintain a similar ratio of 1 : 6.13. Changing out the 2” pulley in this case for a 1.5” pulley will yield a carpet wheel rpm of 211rpm, which is in the ballpark and much more affordable than getting a larger drive shaft pulley.
So in total, I have $135 in the parts, and for the wood, paint, glue, self-adhesive neoprene, carpet, and other little bits here and there, like the keys for the shaft, I’m into it about another $20 or so since that was stuff I already had sitting around. So let’s just call this a $150 machine.
The wood housing was all built using three basic tools: a circular saw, a drill, and a screw gun.
In the video I mentioned the cerium oxide polish that I got for $20 for one pound, well, it was actually $15. I bought it from Kingsley North.
I can already see a few changes I might make to the design in the future, such as a slightly deeper housing around the polishing wheel to contain the cerium oxide a bit better. As it’s designed right now, it catches about 95% of what comes off it, so if it were approximately 1/2” deeper, it might be more effective.
Also, in the future, I would like to try some different kinds of carpet, felt, and canvas on the wheel to see if any of them hold the cerium oxide better than others or if there are any other benefits to using different materials.


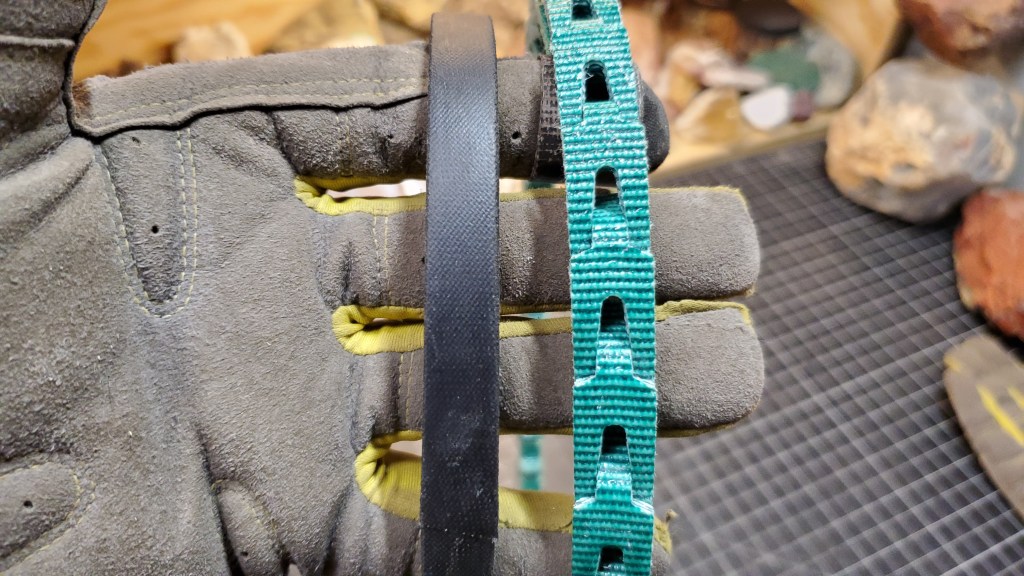
A little bit of a side note here on the kinds of belts that can be used on machines. Pretty much, you have two options, as seen below: you have the standard fixed-length rubber V-belt that is very affordable and can be found at any auto supply store, and then you have the adjustable length segmented V-belt. I’m personally in the camp of preferring the latter since it allows me to adjust my belt lengths as I see fit and take them off other machines I have, if needed, and figure out the exact length needed when building things. However, the belts are rather expensive for what you get, but both work well and fit in pulleys the same.
If you want to figure out the exact length of belt needed, you can find many online pulley calculators, or you can do the following math to figure it out the hard way.
Belt length = ((DL + DS) * π / 2) + (DL – DS) * arcsin((DL – DS) / 2L) + 2 * √(L2− 0.25 * (DL – DS)2)
DL is the diameter of the large pulley;
DS is the diameter of the smaller pulley; and
L is the distance between the pulley axles.


Below are the PDF blueprints for the machine. These blueprints would not have been made possible if it weren’t for my friend Frank Seiler who spent his time drawing these, as it’s far outside my skill set.
These plans are intended to be a guide for you. If you buy different parts, you might find yourself making adjustments to these plans, so the best course of action is to buy all of your parts first before cutting the wood and building the housing, as the parts you buy might be slightly different.
These plans here are intended to be free forever and should never be sold.
This plan is free to use and share.
But please note the following: Currently Rockhounding makes no warranties, expressed or implied, concerning the accuracy, completeness, or suitability of the information provided here, and such information and data should not be construed or used as a legal description. Activities associated with this plan can involve risk of injury, death, property damage, and other dangers associated with such activities. You understand that Currently Rockhounding cannot and does not assume responsibility for any such personal injury, death, or property damage resulting from your use of these plans. Currently Rockhounding is not responsible for the misuse or misrepresentation of the information provided in these plans, and any reliance you place on such information is therefore strictly at your own risk.
Viewer Submissions
Here are some photos and videos of other buffing wheels that people have made based on these plans.
If you build something and want to share your photos, please email them to me at currecntlyrockhounding@gmail.com
A great example of this buffing wheel was made by Josh, Ocklawahaboy Rocks on YouTube.


Below is another great example of a carpet wheel made by Shelton S.

Another great example of a slow speed buffing wheel made based on my plans by Patricia & Paul.


This is a great example of the machine that was built by Scott H.


Here is a great example of a carpet wheel built by Thomas C.


This is a great example of the carpet wheel built by Bill K.


A simple but very effective carpet wheel built by Jeff L.


